- Overview
- Step 1. Create Indeed account
- Step 2. Register your app
- Step 3. Create a NodeJS Express app
- Step 4. Configure your app
- Create config.js file
- Configure session state
- Configure Bootstrap
- Step 5. Expose XML job feed
- Return static list of jobs
- Install npm XML library
- Add sourceName to each job
- Add XML job feed route
- Step 6. Create homepage for app
- Step 7. Authorize your app to call Indeed APIs
- Step 8. Create sponsored jobs campaign
- Create GET /campaign/create route
- Create campaign-create view
- Create POST /campaign/create route
- Create createCampaign method
- Step 9. View sponsored jobs campaigns
- List campaigns
- Get sponsored job campaign details
- Pause, unpause, and delete campaigns
Sponsored Jobs API integration guide to create NodeJS ATS
Create a NodeJS applicant tracking system by calling the Sponsored Jobs API with 3-legged OAuth.
Unless you have a written agreement with Indeed regarding your use of Indeed's APIs, by using this API or its documentation, you agree to apply the Indeed API Terms and the Additional API Terms and Guidelines to your use of Indeed's APIs.
Overview
This step-by-step guide is for ATSs that integrate with Indeed. This guide walks you through how to build a NodeJS Express app for employers who are using your ATS to create sponsored-jobs campaigns.
- Framework: NodeJS
- OAuth: 3-legged OAuth
- Sample code: Sponsored Job Campaigns API
The sample app in this guide illustrates:
- How to share ATS jobs with Indeed using an XML Job Feed.
- How to use 3-legged OAuth to authorize your ATS to call the Indeed Sponsored Jobs API on behalf of employers.
- How to call the
/campaignsendpoint to create a sponsored-job campaign.
Download the sample app code from GitHub:
Step 1. Create Indeed account
Create an Indeed user account for your application.
To complete this task:
- Go to おすすめの求人.
- If signed in, open the Profile menu and select Sign out.
- Select Sign in.
- Select New to Indeed?, then create an account.
- Enter your email address and password.

Step 2. Register your app
When you become an Indeed partner, Indeed sets up an app for your integration. Log in to Partner Console to view your app and OAuth credentials (client ID, secret, and authorization code for 3-legged OAuth). Exchange credentials for an access token to authenticate API calls.
For the OAuth 2.0 credential type:
Register your app Field Value Public client Indicate whether the app is a public client.
If this app integrates the ATS JavaScript Plugin into your ATS site, select This application is a public client.
Allowed grant types Select the authorization code grant type.
Redirect URL Define one or more redirect URLs.
If this app integrates the ATS JavaScript Plugin into your ATS site, add the URL of the page that loads the plugin.
Then, select Save and continue.
Indicate whether you want your app to be reviewed, then select Save and continue.
If you do not have your app reviewed, the user receives a warning message that it has not been reviewed.
Optionally, provide additional company information, then select Save and continue.
Preview your app information, then select Complete registration.
The page shows information about your app, including the client ID, and if your app is not a public client, the client secret.
Secure these credentials. Never share them or store them in a public Git repository.
Approved partners use Partner Console to access testing tools and manage integrations, credentials, and associated APIs and services. For 3-legged OAuth apps, approved partners also use Partner Console to configure redirect URLs and view what the OAuth consent screen looks like to users.
Step 3. Create a NodeJS Express app
To authorize the OAuth client app to call the Indeed API, the sample NodeJS Express app uses the open-source openid-client library.
To create the NodeJS Express app:
-
Download and install Node.js and npm.
-
Generate the
Find-TalentExpress app that uses the HandlebarsJS view engine:npx express-generator Find-Talent --view=hbs --gitThe
--gitoption generates a.gitignorefile for Express. -
Change into the directory where the
package.jsonfile is located. -
Install the required npm packages:
npm install -
Update your
package.jsonfile so that it includes theopenid-clientlibrary:npm install openid-client -
Install the open-source Axios library, which updates your
package.jsonfile:npm install axios -
Start your Express app:
npm start -
In the browser, go to http://localhost:3000/.
The default Express index page appears with the message
Welcome to Express.
Step 4. Configure your app
To configure your Express app, create a configuration file, set up the session state, and enable Bootstrap.
Create config.js file
To store your secrets, create a config.js file in the root of the Find-Talent app with this content:
const config = {  oysterBaseURL: 'https://apis.indeed.com/ads/v1',  oauthDiscovery: 'https://secure.indeed.com/.well-known/openid-configuration',  oauthClientId: '90f9f4bd6a34cac31daebe1a093a606ce6b34e91ae6cfa139432ae387269a529',  oauthClientSecret: 'bML2BGshr8mLng6d1c1qCujH2PgblxEJwW5WqLxpr32XWfAFSonlhIE07buG7Nlr',  oauthRedirectURL: 'http://localhost:3000/oauth-callback',  scope: 'employer_access offline_access employer.advertising.account.read employer.advertising.campaign',  sessionSecret: 'Something Secret!',};
module.exports = config;
Notice the scope setting. This setting contains a list of all of the scopes (permissions) required by your OAuth app.
To create sponsored-job campaigns, for example, you need the employer.advertising.campaign.
For the list of scopes, see Sponsored Jobs API scopes for ATS partners.
Replace the value of oauthClientId and oauthClientSecret with your registered OAuth client app's client ID and client secret, which you can find on the Manage app credentials page.
The sessionSecret configuration setting is used by Express session state. Replace “Something Secret!” with a new secret (anything you want).
Because the config.js file is full of secrets, ensure that you do not make this file public (for example, don’t place your config.js file in a public GitHub repository).
Configure session state
To avoid repeatedly requesting an access token, you can store the access token in session state. To enable session state for your Express app, run the following command:
npm install express-sessionThis command adds a dependency to the package.json file.

To configure session state, you modify the app.js file. Add this code near the top of the app.js file:
const config = require('./config');const session = require('express-session');Next, find this line of code in the app.js file:
var app=express(); Add this code immediately below it:
// session setupapp.use(session({ secret: config.sessionSecret, resave: false, saveUninitialized: true, cookie: { secure: false },}));You can use req.session in your controllers to store items in session state that persist across multiple requests.
Configure Bootstrap
The easiest way to style your app is to use the open-source Bootstrap CSS framework. Open the views/layout.hbs file and add this code immediately below the <title> tag:
<link   href="https://cdn.jsdelivr.net/npm/bootstrap@5.0.0-beta2/dist/css/bootstrap.min.css"   rel="stylesheet"   integrity="sha384-BmbxuPwQa2lc/FVzBcNJ7UAyJxM6wuqIj61tLrc4wSX0szH/Ev+nYRRuWlolflfl"   crossorigin="anonymous">
<script src="https://cdn.jsdelivr.net/npm/bootstrap@5.0.0-beta2/dist/js/bootstrap.bundle.min.js"   integrity="sha384-b5kHyXgcpbZJO/tY9Ul7kGkf1S0CWuKcCD38l8YkeH8z8QjE0GmW1gYU5S9FOnJ0"   crossorigin="anonymous"></script>
The complete layout.hbs page template file looks like this:
<!DOCTYPE html><html>  <head>    <title>Sponsor Jobs</title>
    <link href="https://cdn.jsdelivr.net/npm/bootstrap@5.0.0-beta2/dist/css/bootstrap.min.css"       rel="stylesheet"       integrity="sha384-BmbxuPwQa2lc/FVzBcNJ7UAyJxM6wuqIj61tLrc4wSX0szH/Ev+nYRRuWlolflfl"       crossorigin="anonymous">    <script src="https://cdn.jsdelivr.net/npm/bootstrap@5.0.0-beta2/dist/js/bootstrap.bundle.min.js"       integrity="sha384-b5kHyXgcpbZJO/tY9Ul7kGkf1S0CWuKcCD38l8YkeH8z8QjE0GmW1gYU5S9FOnJ0"       crossorigin="anonymous"></script>
    <link rel='stylesheet' href='/stylesheets/style.css' />  </head>  <body>    {{>header}}    <div class="container">      {{{body}}}    </div>  </body></html>
Step 5. Expose XML job feed
Before an employer can sponsor a job on Indeed, Indeed must first be aware of a job. To make Indeed aware of jobs hosted on your ATS, expose an XML Job Feed. This section describes the correct format for the XML job feed.
Return static list of jobs
In an actual ATS, you store the jobs posted by employers in a database. To keep things simple in the sample app, create a method that returns a static list of jobs:
static listJobs() { return [ { id: 2312, title: 'Product Manager', description: 'Manage products', posted: new Date('1/12/2021'), url: 'https://example.com/job/2312', city: 'Seattle', state: 'WA', country: 'USA', }, { id: 2313, title: 'Python Engineer', description: 'Must be an expert in Django.', posted: new Date('1/12/2021'), url: 'https://example.com/job/2313', city: 'Seattle', state: 'WA', country: 'USA', }, { id: 2314, title: 'Senior Python Engineer', description: 'Must be an expert in Django.', posted: new Date('1/12/2021'), url: 'https://example.com/job/2314', city: 'Seattle', state: 'WA', country: 'USA', }, ];}You can find this method in the \services\JobService.js file.
Install npm XML library
To convert the list of jobs into XML, use the Node Package Manager (npm) XML library. To install the XML library:
npm install xmlAdd sourceName to each job
Ensure that each job has all of the data that Indeed requires. In particular, ensure that each job has a referenceNumber and a sourceName. This method, which is also in the services\JobService.js file, adds the necessary data:
static listJobsAsXML() {  const jobs = this.listJobs().map((j) => ({    job: [      { title: { _cdata: j.title } },      { description: { _cdata: j.description } },      { date: { _cdata: j.posted } },      { referenceNumber: { _cdata: j.id } },      { url: { _cdata: j.url } },      { company: { _cdata: 'US Robotics and Mechanical Men' } },      { sourceName: { _cdata: 'Apple' } },      { city: { _cdata: j.city } },      { state: { _cdata: j.state } },      { country: { _cdata: j.country } },      { email: { _cdata: 'your_email@your_company.com' } },      { metadata: { _cdata: '' } },    ],  }));
  return [    {      source: [        { publisher: 'Superhero ATS' },        { publisherurl: 'https://example.com' },        { lastBuildDate: Date() },        ...jobs,      ],    },  ];}
The listJobsAsXML() method converts each job into a format that Indeed can read. Notice that each job has both a referenceNumber, which is a unique id, and a sourceName, which has the value 'Apple'. Indeed uses the sourceName to associate each job with the correct employer.
Add XML job feed route
Next, expose your list of jobs as XML. Add the following jobFeed.js to your app's routes folder:
const express = require('express');const xml = require('xml');const JobService = require('../services/JobService');
const router = express.Router();
router.get('/', async (req, res) => {  res.contentType('application/xml');  res.send(xml(JobService.listJobsAsXML(), true));});
module.exports = router;
This route calls the listJobsAsXML() method and passes the results to the XML library. The list of jobs are exposed as XML in a format that Indeed can read:
<source> <publisher>Superhero ATS</publisher> <publisherurl>https://example.com</publisherurl> <lastBuildDate>Mon May 24 2021 14:43:59 GMT-0700 (Pacific Daylight Time)</lastBuildDate> <job> <title><![CDATA[Product Manager]]></title> <description><![CDATA[Manage products]]></description> <date><![CDATA[Tue Jan 12 2021 00:00:00 GMT-0800 (Pacific Standard Time)]]></date> <referenceNumber><![CDATA[2312]]></referenceNumber> <url><![CDATA[https://example.com/job/2312]]></url> <company><![CDATA[US Robotics and Mechanical Men]]></company> <sourceName><![CDATA[Apple]]></sourceName> <city><![CDATA[Seattle]]></city> <state><![CDATA[WA]]></state> <country><![CDATA[USA]]></country> <email><![CDATA[your_email@your_company.com]]></email> <metadata/> </job> <job> <title><![CDATA[Python Engineer]]></title> <description><![CDATA[Must be an expert in Django.]]></description> <date><![CDATA[Tue Jan 12 2021 00:00:00 GMT-0800 (Pacific Standard Time)]]></date> <referenceNumber><![CDATA[2313]]></referenceNumber> <url><![CDATA[https://example.com/job/2313]]></url> <company><![CDATA[US Robotics and Mechanical Men]]></company> <sourceName><![CDATA[Apple]]></sourceName> <city><![CDATA[Seattle]]></city> <state><![CDATA[WA]]></state> <country><![CDATA[USA]]></country> <email><![CDATA[your_email@your_company.com]]></email> <metadata/> </job> <job> <title><![CDATA[Senior Python Engineer]]></title> <description><![CDATA[Must be an expert in Django.]]></description> <date><![CDATA[Tue Jan 12 2021 00:00:00 GMT-0800 (Pacific Standard Time)]]></date> <referenceNumber><![CDATA[2314]]></referenceNumber> <url><![CDATA[https://example.com/job/2314]]></url> <company><![CDATA[US Robotics and Mechanical Men]]></company> <sourceName><![CDATA[Apple]]></sourceName> <city><![CDATA[Seattle]]></city> <state><![CDATA[WA]]></state> <country><![CDATA[USA]]></country> <email><![CDATA[your_email@your_company.com]]></email> <metadata/> </job></source>Step 6. Create homepage for app
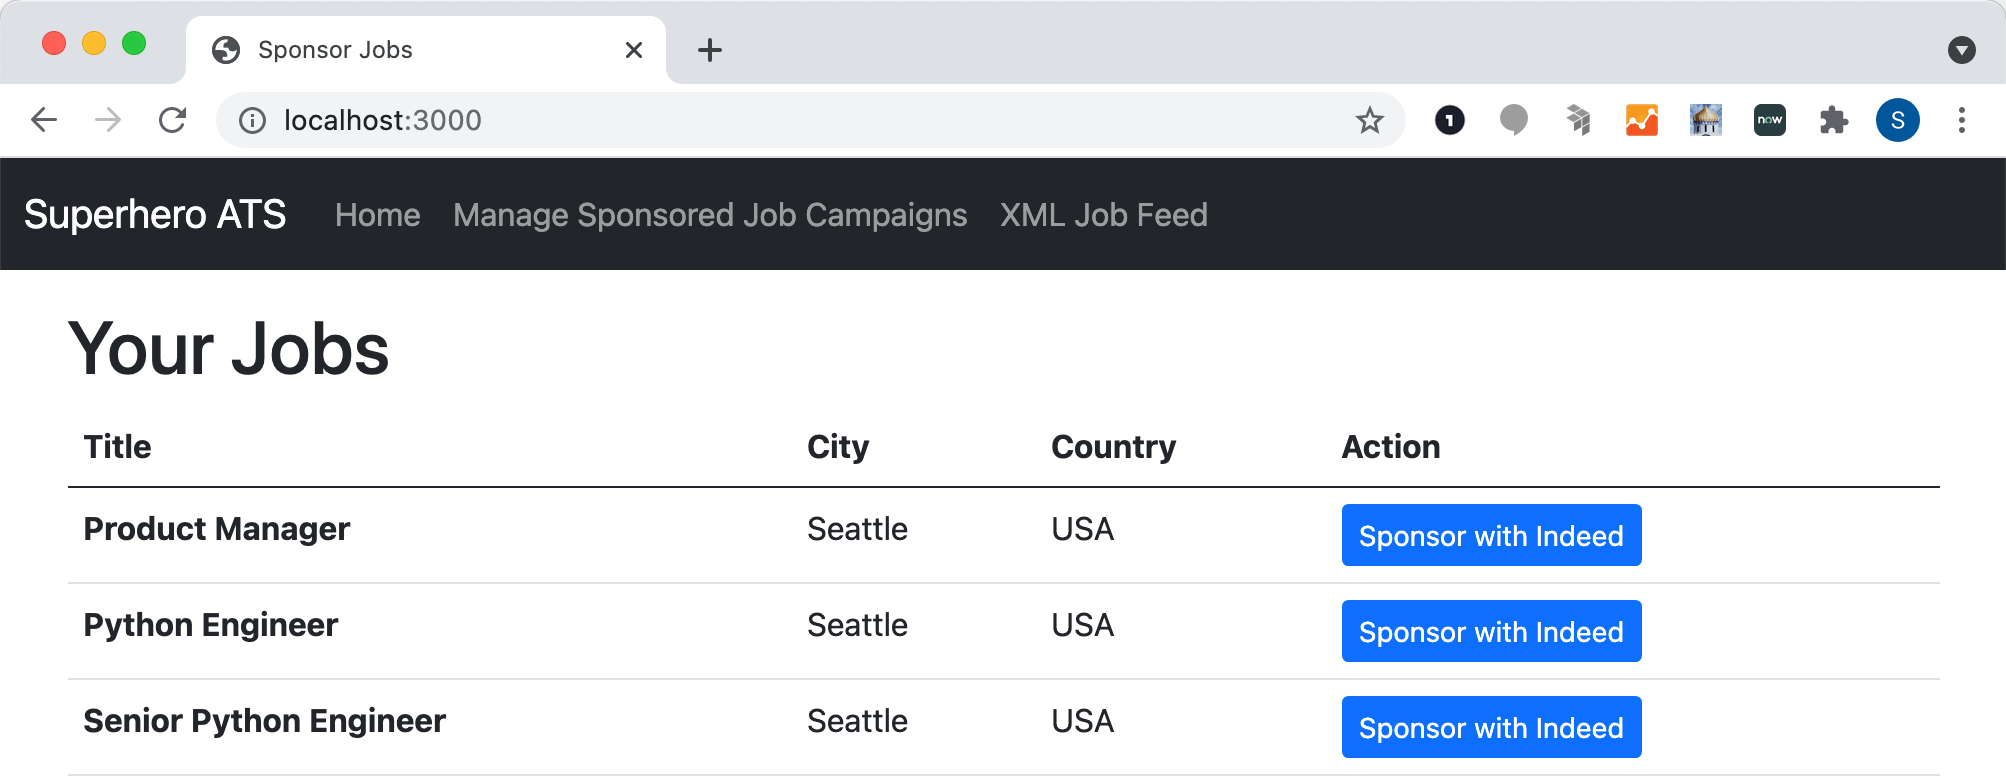
The homepage of the sample app lists jobs with a Sponsor with Indeed button next to each job.
The homepage leverages the JobService listJobs() method.
The JavaScript code for the homepage located in routes\index.js is:
const express = require('express');const JobService = require('../services/JobService');
const router = express.Router();
/* GET home page. */router.get('/', async (req, res) => {  const jobs = JobService.listJobs();  res.render('index', {    jobs,  });});
module.exports = router;
This view is for the homepage:
<h1>Your Jobs</h1>
{{#unless jobs}}  <div class="alert alert-primary mt-3" role="alert">  <p>      You don't have any jobs.  </p>  </div>{{else}}<table class="table">  <thead>    <tr>      <th scope="col">Title</th>      <th scope="col">City</th>      <th scope="col">Country</th>      <th scope="col">Action</th>    </tr>  </thead>  <tbody>    {{#each jobs}}    <tr>      <th scope="row">{{this.title}}</th>      <td>{{this.city}}</td>      <td>{{this.country}}</td>      <td><a href="/campaign/create/{{this.id}}" class="btn btn-primary btn-sm" role="button">Sponsor with Indeed</a></td>    </tr>    {{/each}}  </tbody></table>{{/unless}}
When an employer selects Sponsor with Indeed, the employer navigates to the /campaign/create route.
Step 7. Authorize your app to call Indeed APIs
The sample app leverages Express middleware to enforce OAuth authorization. The middleware checks whether the current user has an OAuth access token and, if not, the user is redirected to the Indeed OAuth consent screen.
The Express middleware is in the middleware\IndeedOAuthAuthorize.js file:
const config = require('../config');const IndeedOAuthService = require('../services/IndeedOAuthService');
async function IndeedOAuthAuthorize(req, res, next) {  const indeedOAuth = new IndeedOAuthService(config, req.session);  const tokenSet = await indeedOAuth.getTokenSet(null);
  if (!tokenSet) {    req.session.returnUrl = req.originalUrl;    const authorizeURL = await indeedOAuth.getAuthorizeURL('employer_access offline_access');    res.redirect(authorizeURL);  } else {    res.locals.tokenSet = tokenSet;    next();  }}
module.exports = IndeedOAuthAuthorize;
The IndeedOAuthAuthorize middleware enforces authorization for each of the routes that require an OAuth access token. For example, the Sponsor with Indeed button links to the /campaign/create route.
The app uses IndeedOAuthAuthorize middleware with this route:
router.get('/create/:jobId', IndeedOAuthAuthorize, async (req, res) => { ....ommited...}If an employer using the ATS requests the /campaign/create route, and the app has not been authorized to act on behalf of the employer, then the employer is redirected to the OAuth consent screen:
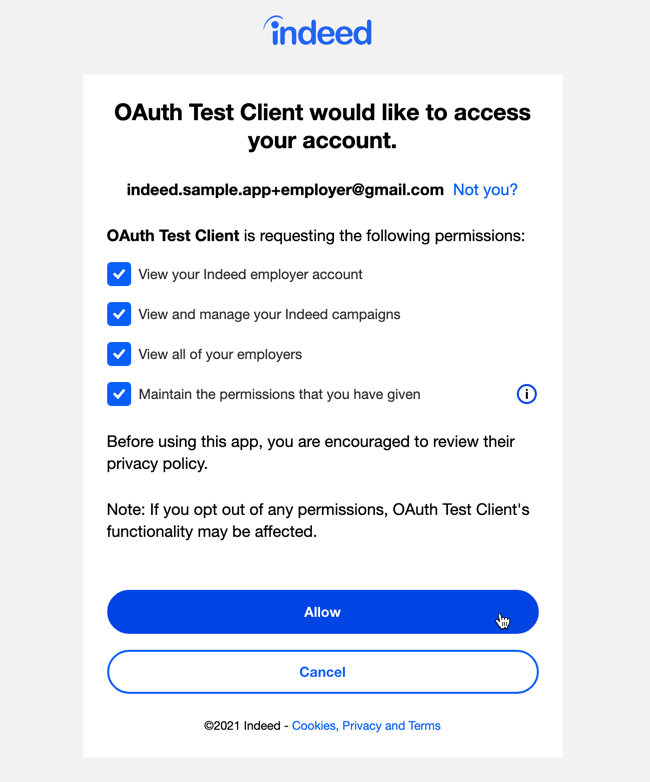
After the employer selects Allow, then the OAuth select employer screen appears. This screen enables the employer to select a particular employer to associate with their OAuth access token. For example, in the following image, the employer can select the employer US Robotics and Mechanical Men.
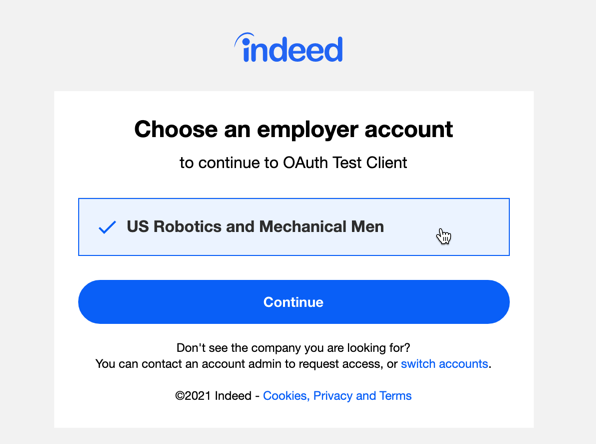
After the employer selects Continue, the sample app gets an OAuth access token from Indeed and stores the access token in session state. If the employer selects another route that requires authorization, the middleware can get the access token directly from session state, and the employer does not need to authorize your app again.
Step 8. Create sponsored jobs campaign
To enable an employer to sponsor any of their Indeed jobs, create an Indeed sponsored job campaign.
Create GET /campaign/create route
Create the campaign.js route for handling an HTTP GET request:
router.get('/create/:jobId', IndeedOAuthAuthorize, async (req, res) => { const jobId = Number(req.params.jobId); const job = JobService.getJob(jobId); const campaignService = new CampaignService(config, req.session, res.locals.tokenSet);
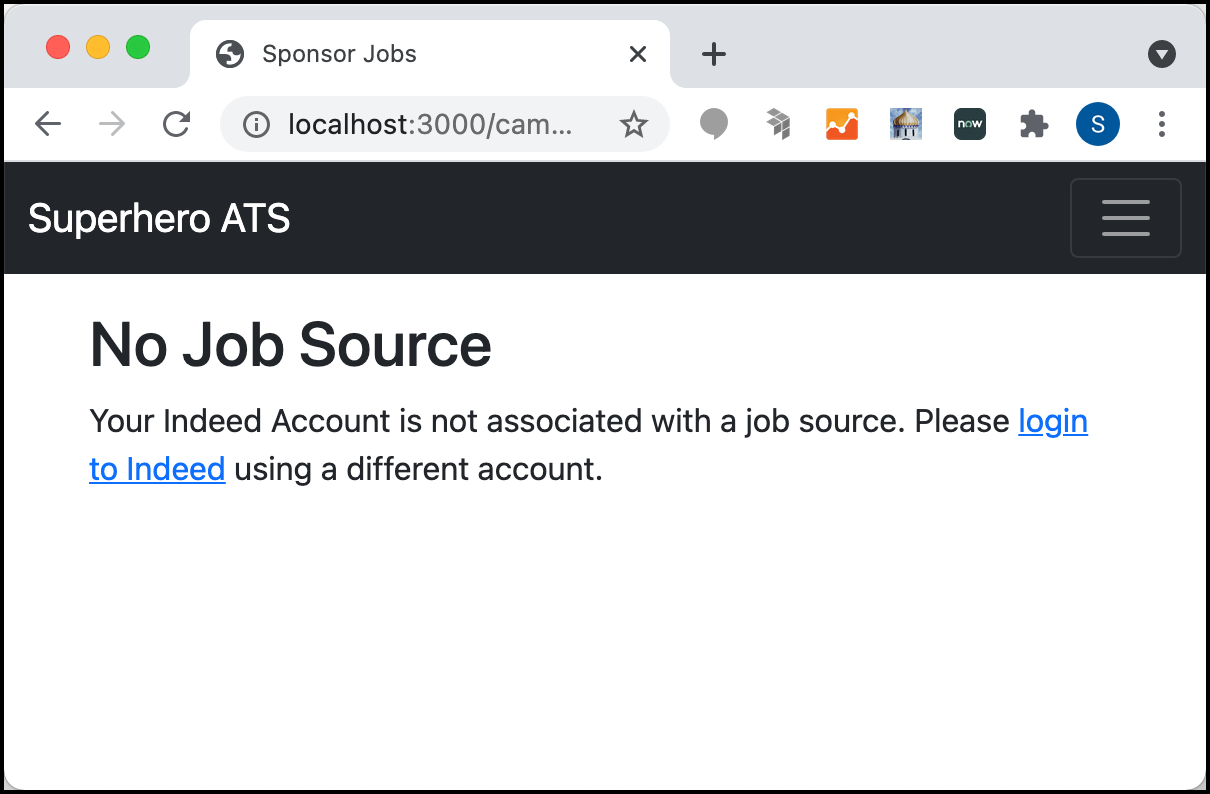
// get account const account = await campaignService.getAccount(); if (!account.jobSourceList || account.jobSourceList.length === 0) { res.redirect('/campaign/no-job-source'); } else { // create campaign defaults const newCampaign = { startDate: getISODateString(new Date()), targetEndDate: getISODateString(getFutureDate(3)), budgetMonthlyLimit: 100.00, budgetOneTimeLimit: 100.00, };
res.render('campaign-create', { job, newCampaign, }); }});Notice that the code calls the campaignService.getAccount() method to get the employer's Indeed account. This method returns a response that looks like this:
{ "jobSourceList": [{ "id": "67c9fd651aff79bf", "siteName": "Apple" }], "contact": "Susan Calvin", "company": "US Robotics and Mechanical Men", "id": "5266416001932948", "email": "indeed.sample.app+employer@gmail.com"}The account information returned includes a jobSourceList. Each job source has an id and siteName. The siteName must correspond to the sourceName associated with each job in the XML job feed. See Add sourceName to each job. You use the id and siteName to create a sponsored-job campaign.
The route verifies whether an account includes at least one job source. If not, then the employer cannot sponsor a job and the sample app displays an error page to the employer.
Create campaign-create view
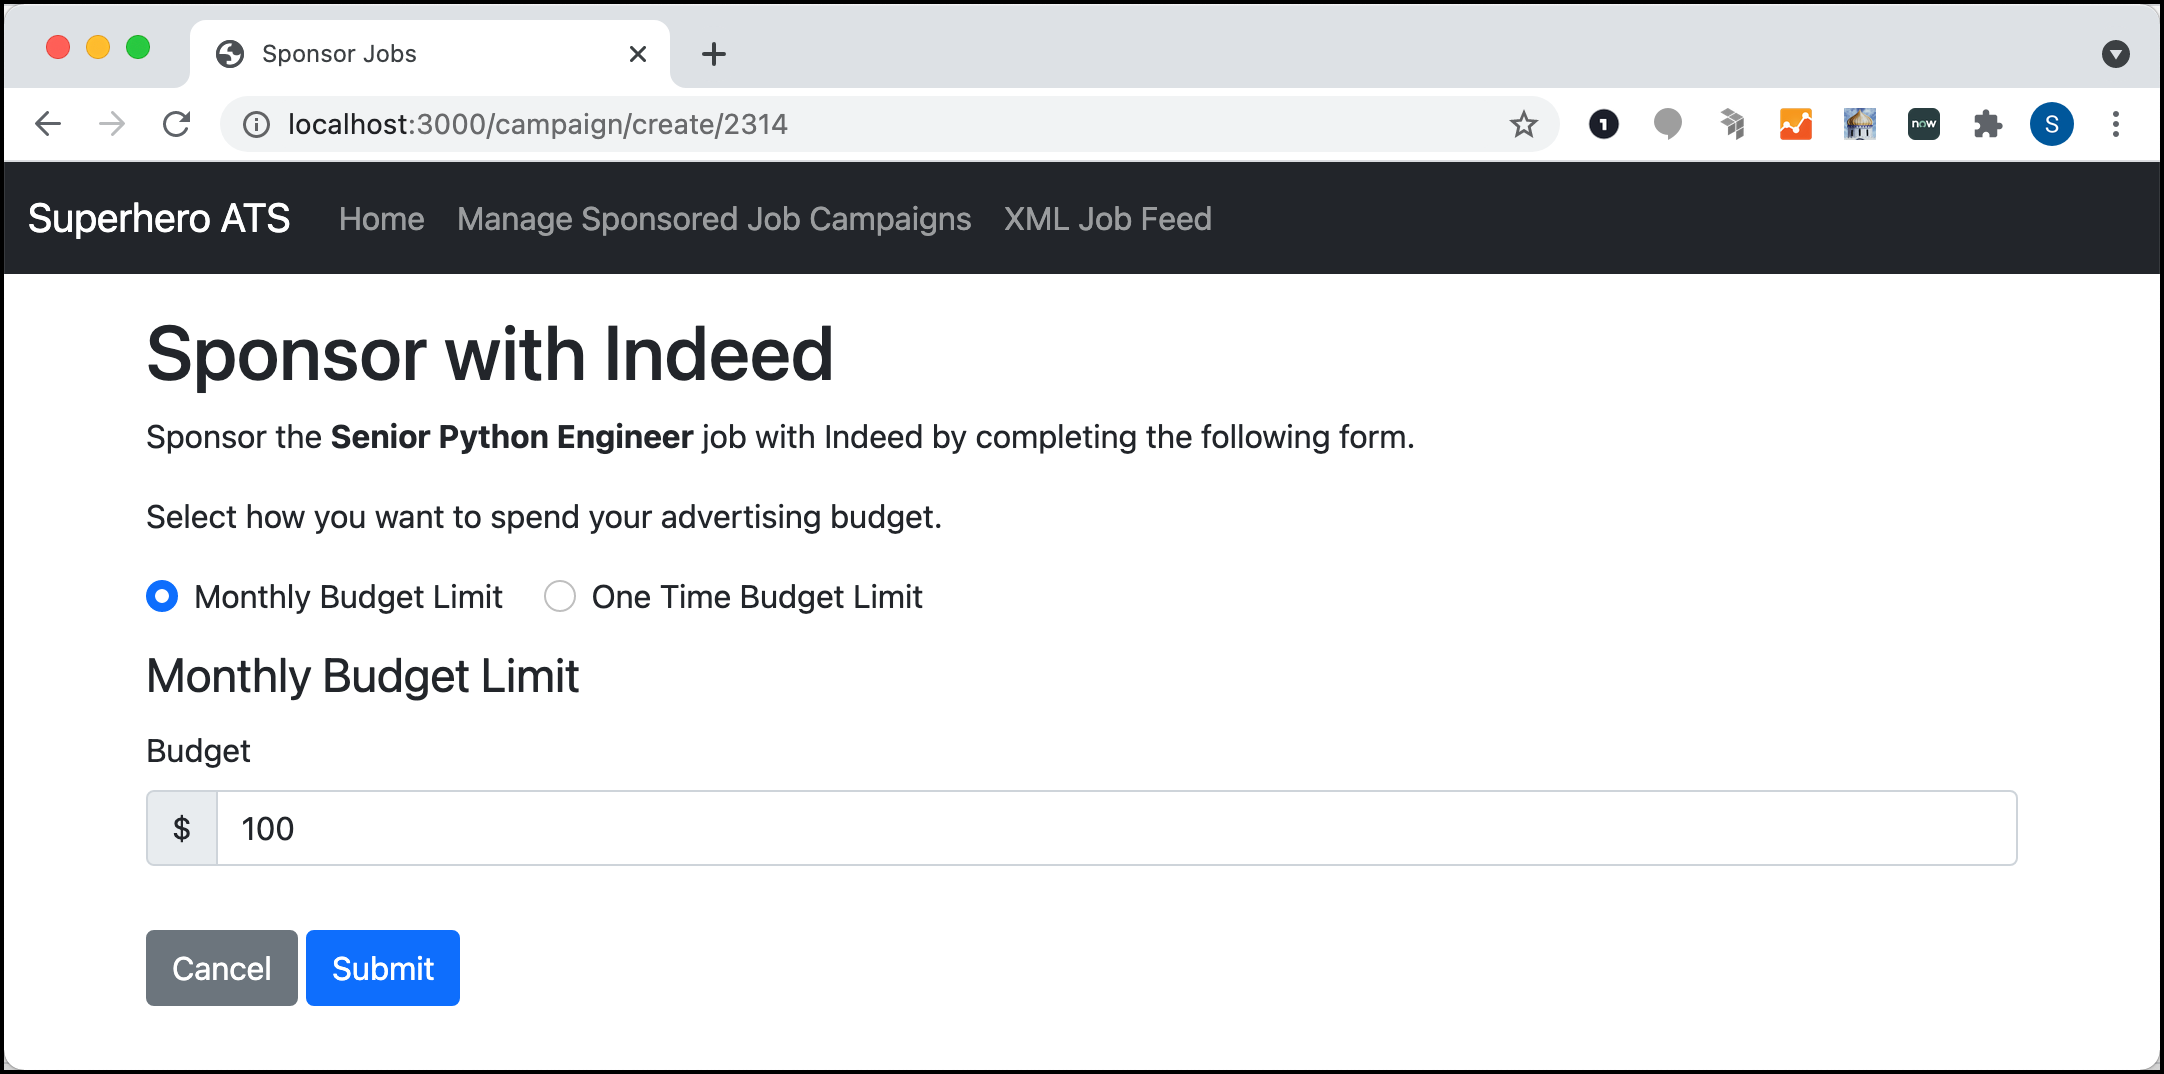
If the account includes at least one job source, then the sample app displays the create-campaign view. This view enables an employer to specify a budget for sponsoring a job on Indeed. The employer can decide to set a monthly budget:
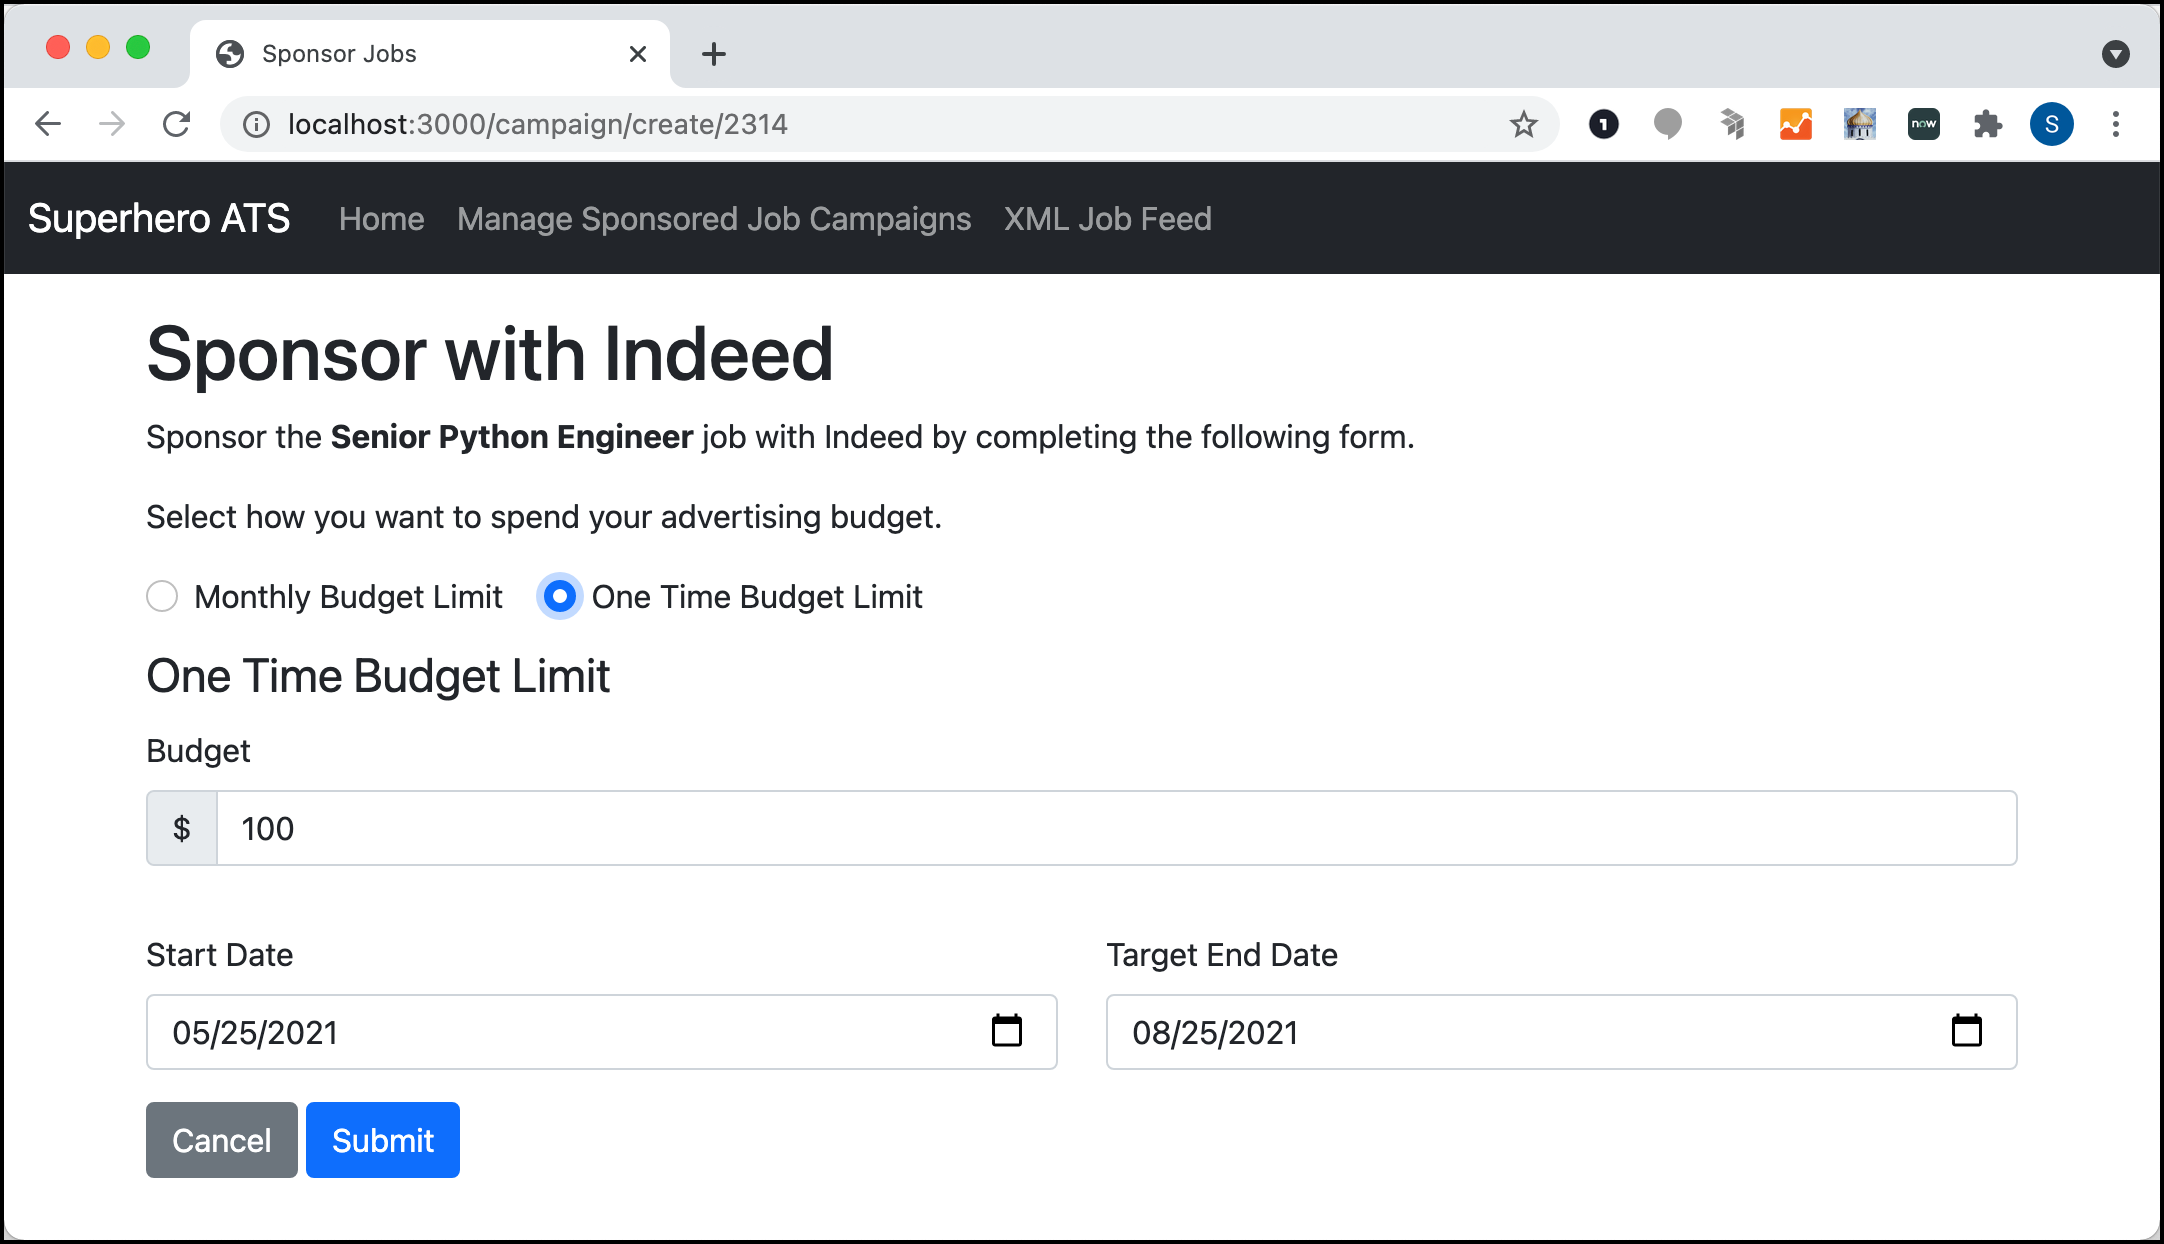
Or, the employer can decide to set a one-time budget with start and end dates:
The markup to create the create-campaign view is:
<h1>Sponsor with Indeed</h1>
<p>  Sponsor the <b>{{job.title}}</b> job with Indeed by completing the following form.</p>
<form method="post" action="/campaign/create/{{job.id}}">
  <div class="row g-3">    <div class="col">      <p>        Select how you want to spend your advertising budget.      </p>      <div class="form-check form-check-inline">        <input class="form-check-input" name="selectBudgetType" type="radio" id="monthlyRadio" value="monthly" checked />        <label class="form-check-label" for="monthlyRadio">Monthly Budget Limit</label>      </div>
      <div class="form-check form-check-inline">        <input class="form-check-input" name="selectBudgetType" type="radio" id="oneTimeRadio" value="oneTime">        <label class="form-check-label" for="oneTimeRadio">One Time Budget Limit</label>      </div>    </div>  </div>
  <fieldset id="monthly" class="mt-2">    <legend>Monthly Budget Limit</legend>
    <div class="row mb-3">      <div class="col">        <label for="budgetMonthlyLimit" class="form-label">Budget</label>        <div class="input-group mb-3">          <span class="input-group-text">$</span>          <input name="budgetMonthlyLimit" id="budgetMonthlyLimit" type="number" min="50" step="any"            class="form-control" placeholder="Budget" value="{{newCampaign.budgetMonthlyLimit}}" />        </div>      </div>    </div>
  </fieldset>
  <fieldset id="oneTime" style="display:none" class="mt-2">    <legend>One Time Budget Limit</legend>
    <div class="row mb-3">      <div class="col form-group">        <label for="budgetOneTimeLimit" class="form-label">Budget</label>        <div class="input-group mb-3">          <span class="input-group-text">$</span>          <input name="budgetOneTimeLimit" id="budgetOneTimeLimit" type="number" min="50" step="any"            class="form-control" value="{{newCampaign.budgetOneTimeLimit}}" />        </div>      </div>    </div>
    <div class="row mb-3">      <div class="col">        <label for="startDate" class="form-label">Start Date</label>        <input name="startDate" id="startDate" type="date" class="form-control"           placeholder="Start Date" value="{{newCampaign.startDate}}" />      </div>      <div class="col">        <label for="targetEndDate" class="form-label">Target End Date</label>        <input name="targetEndDate" id="targetEndDate" type="date" class="form-control"           placeholder="Target End Date" value="{{newCampaign.targetEndDate}}" />      </div>    </div>
  </fieldset>
  <div class="row mb-3">    <div class="col">      <a class="btn btn-secondary mr-2" href="/">Cancel</a>      <button type="submit" class="btn btn-primary">Submit</button>    </div>  </div>
</form>
<script>  const monthly = document.getElementById('monthly');  const oneTime = document.getElementById('oneTime');
  document.getElementById('oneTimeRadio').addEventListener('click', (e) => {    monthly.style.display = 'none';    oneTime.style.display = 'block';  });
  document.getElementById('monthlyRadio').addEventListener('click', (e) => {    monthly.style.display = 'block';    oneTime.style.display = 'none';  });</script>
The markup leverages Bootstrap to create an HTML form. The form consists two HTML fieldsets:
- One fieldset for the monthly budget
- One fieldset for the one-time budget
The page uses a small amount of JavaScript at the bottom of the view to display only one of the two fieldsets at a time.
Create POST /campaign/create route
When an employer submits the form in the create-campaign view, the sample app invokes the POST campaign/create route. This route gets the values of the form fields and calls the JobService createCampaign() method to create the sponsored-jobs campaign.
router.post('/create/:jobId', IndeedOAuthAuthorize, async (req, res) => {  const campaignService = new CampaignService(config, req.session, res.locals.tokenSet);
  // get job  const jobId = Number(req.params.jobId);  const job = JobService.getJob(jobId);
  // get form fields  const newCampaign = {    name: `${job.title} - ${new Date().toUTCString()}`,    budgetType: req.body.selectBudgetType,    budgetMonthlyLimit: Number(req.body.budgetMonthlyLimit),    budgetOneTimeLimit: Number(req.body.budgetOneTimeLimit),    startDate: getISODateString(new Date(req.body.startDate)),    targetEndDate: getISODateString(new Date(req.body.targetEndDate)),  };
  // get account  const account = await campaignService.getAccount();
  // sponsor job  campaignService.createCampaign(account, job, newCampaign);
  res.redirect('/');});
Create createCampaign method
The createCampaign() method in the services\JobService.js file calls the Sponsored Jobs API and creates the job campaign.
Notice that the createCampaign() method uses the job source ID and siteName to create a campaign. The sample app gets the site name from the employer account.
Also, the sample code includes the job ID, the reference number from the XML job feed, in the Sponsored Jobs API request call.
async createCampaign(account, job, newCampaign) {  let request = {    name: newCampaign.name,    jobsSourceId: account.jobSourceList[0].id,    jobsSourceName: account.jobSourceList[0].siteName,    jobsToInclude: 'query',    jobsQuery: `refnum:${job.id}`,  };
  if (newCampaign.budgetType === 'monthly') {    request = {      ...request,      ...{        budgetMonthlyLimit: newCampaign.budgetMonthlyLimit,        budgetFirstMonthBehavior: 'startNowProratedAmount',      },    };  }  if (newCampaign.budgetType === 'oneTime') {    request = {      ...request,      ...{        budgetOnetimeLimit: newCampaign.budgetOneTimeLimit,        startDate: newCampaign.startDate,        targetEndDate: newCampaign.targetEndDate,      },    };  }  const url = `${this.config.oysterBaseURL}/campaigns`;  const results = await this.requestResource(url, 'POST', request);  return results;}
The createCampaign() method calls the Indeed Sponsored Jobs API through requestResource(), which uses Axios to make the HTTP request.
The sample code passes the OAuth access token in the Authorization header. Indeed rejects any request that omits it.
async requestResource(url, method = 'GET', data) { console.info(`Axios ${method}: ${url}`); try { const results = await axios({ url, method, headers: { Authorization: `Bearer ${this.tokenSet.access_token}`, }, data, }); return results.data.data; } catch (err) { console.error('Error when making request'); console.dir(err.response.data, { depth: null }); throw err; }}After an employer submits the form to create a sponsored-jobs campaign, redirect the employer to the homepage of the sample app.
Step 9. View sponsored jobs campaigns
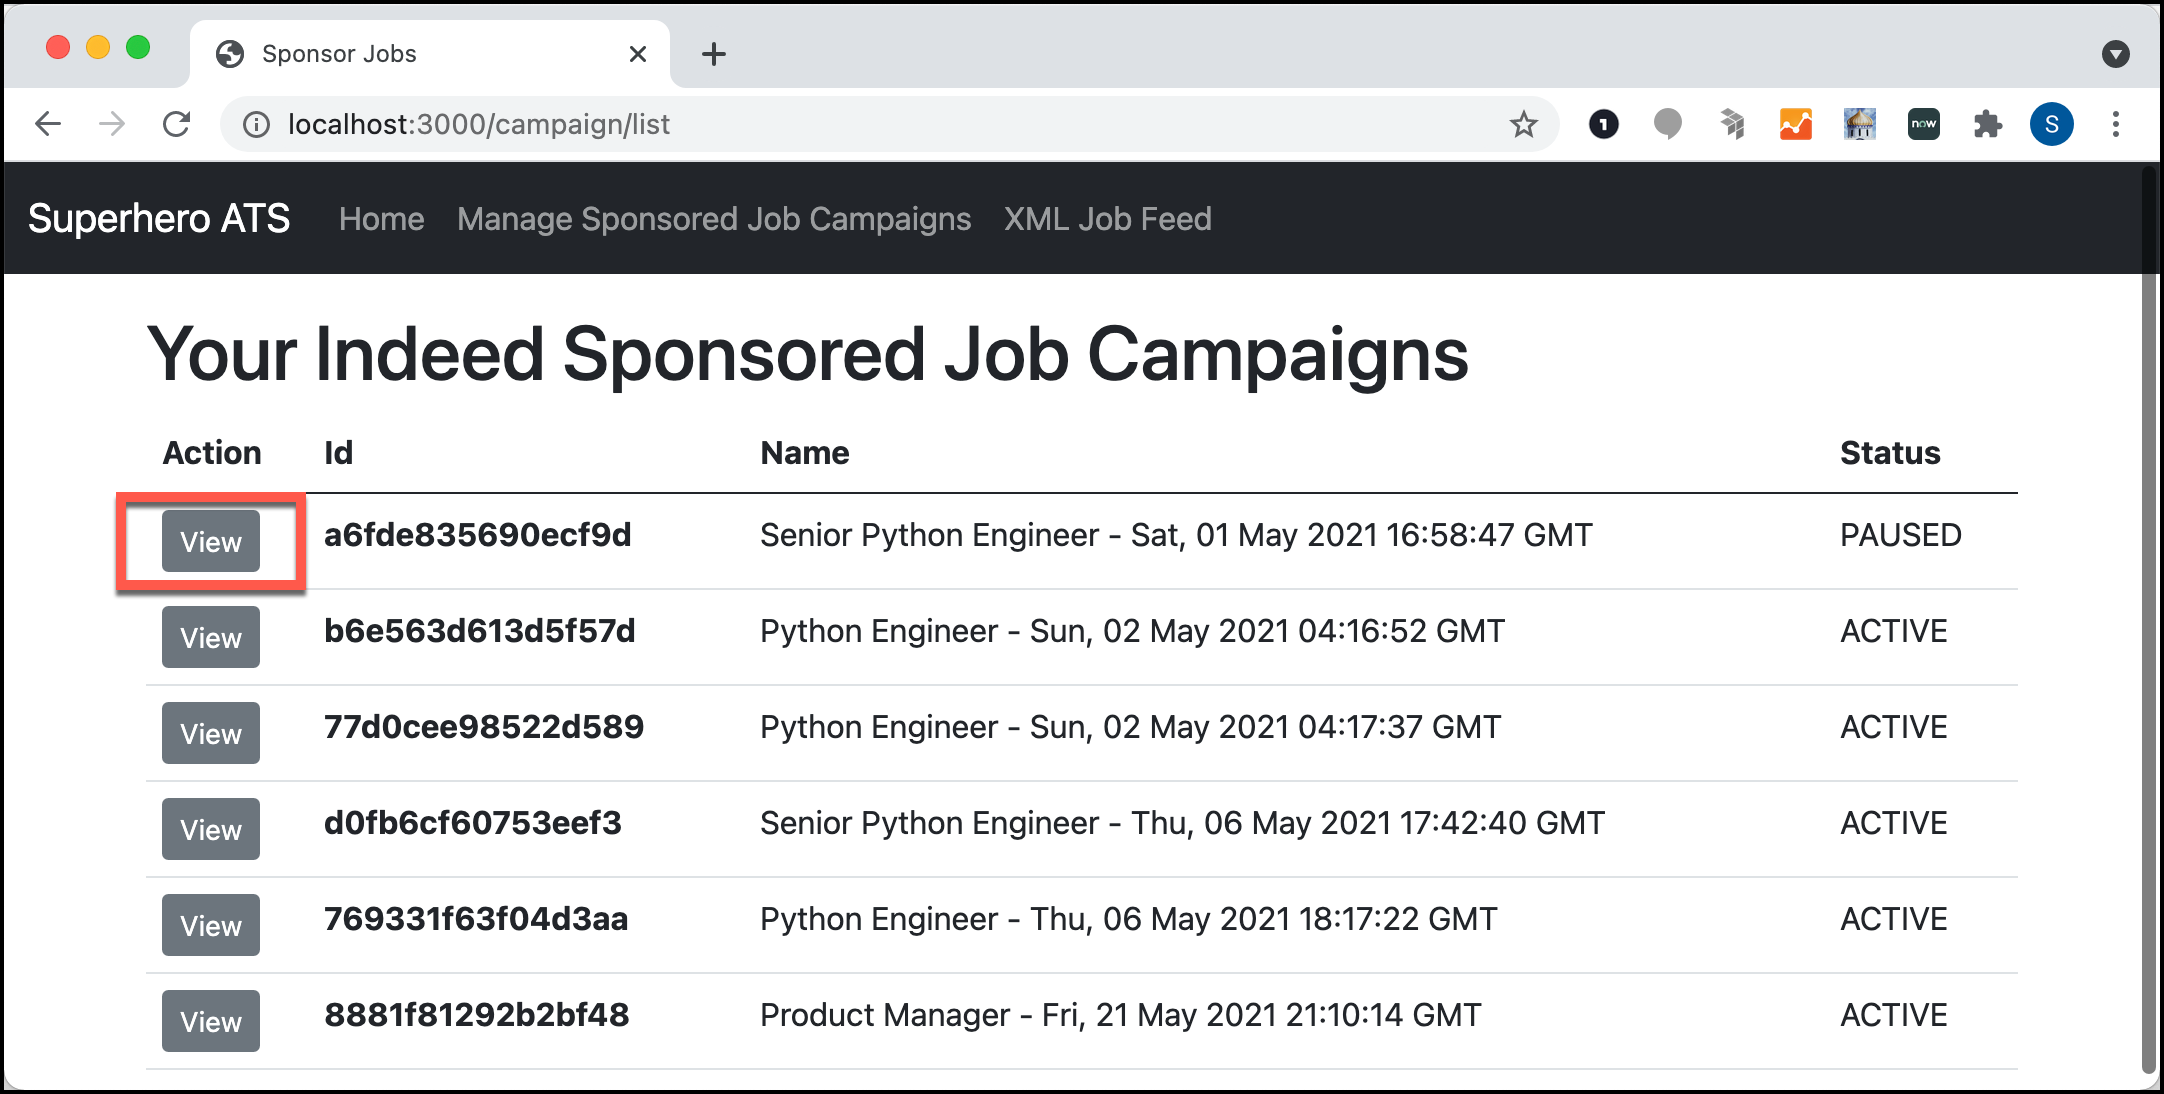
An employer can select the Manage Sponsored Jobs Campaigns menu item in the header to list all their campaigns.
You can list campaigns, get details for a particular campaign, and pause, unpause, and delete campaigns.
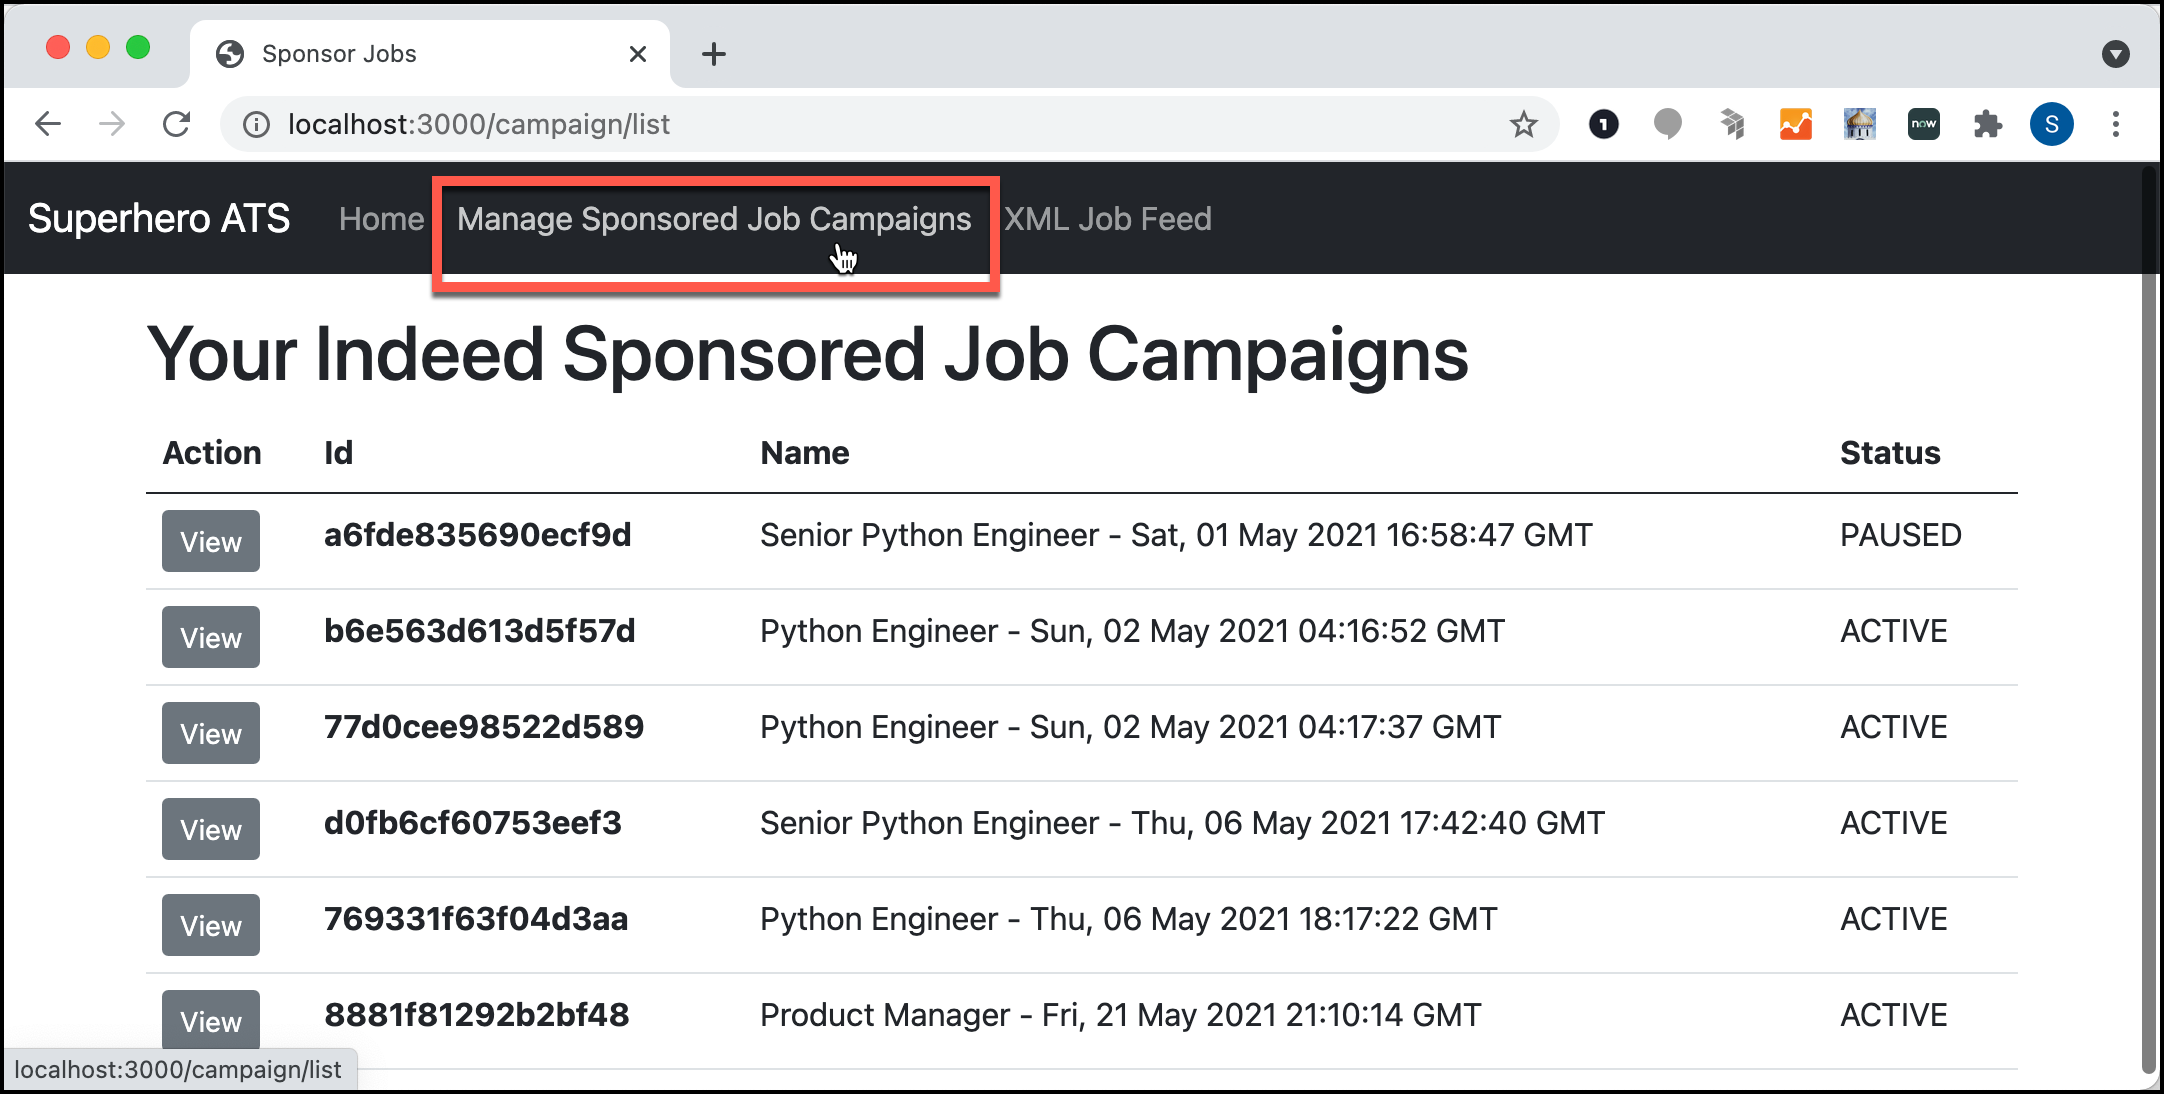
List campaigns
To list campaigns for an employer, make a GET request against the /campaigns endpoint.
The getCampaigns() method from the CampaignService.js file is:
async getCampaigns() { const url = `${this.config.oysterBaseURL}/campaigns`; const results = await this.requestResource(url); // filter out deleted campaigns return results.Campaigns.filter((c) => c.Status !== 'DELETED');}This method returns a JSON response:
[{    "Name": "Senior Python Engineer - Sat, 01 May 2021 16:58:47 GMT",    "Id": "a6fde835690ecf9d",    "Status": "PAUSED"  },  {    "Name": "Senior Python Engineer - Thu, 06 May 2021 17:42:40 GMT",    "Id": "d0fb6cf60753eef3",    "Status": "ACTIVE"  },
  {    "Name": "Product Manager - Fri, 21 May 2021 21:10:14 GMT",    "Id": "8881f81292b2bf48",    "Status": "ACTIVE"  }]
The response includes the Name, Id, and Status fields for each campaign.
A campaign can be ACTIVE, PAUSED, or DELETED.
The getCampaigns() method removes any deleted campaigns.
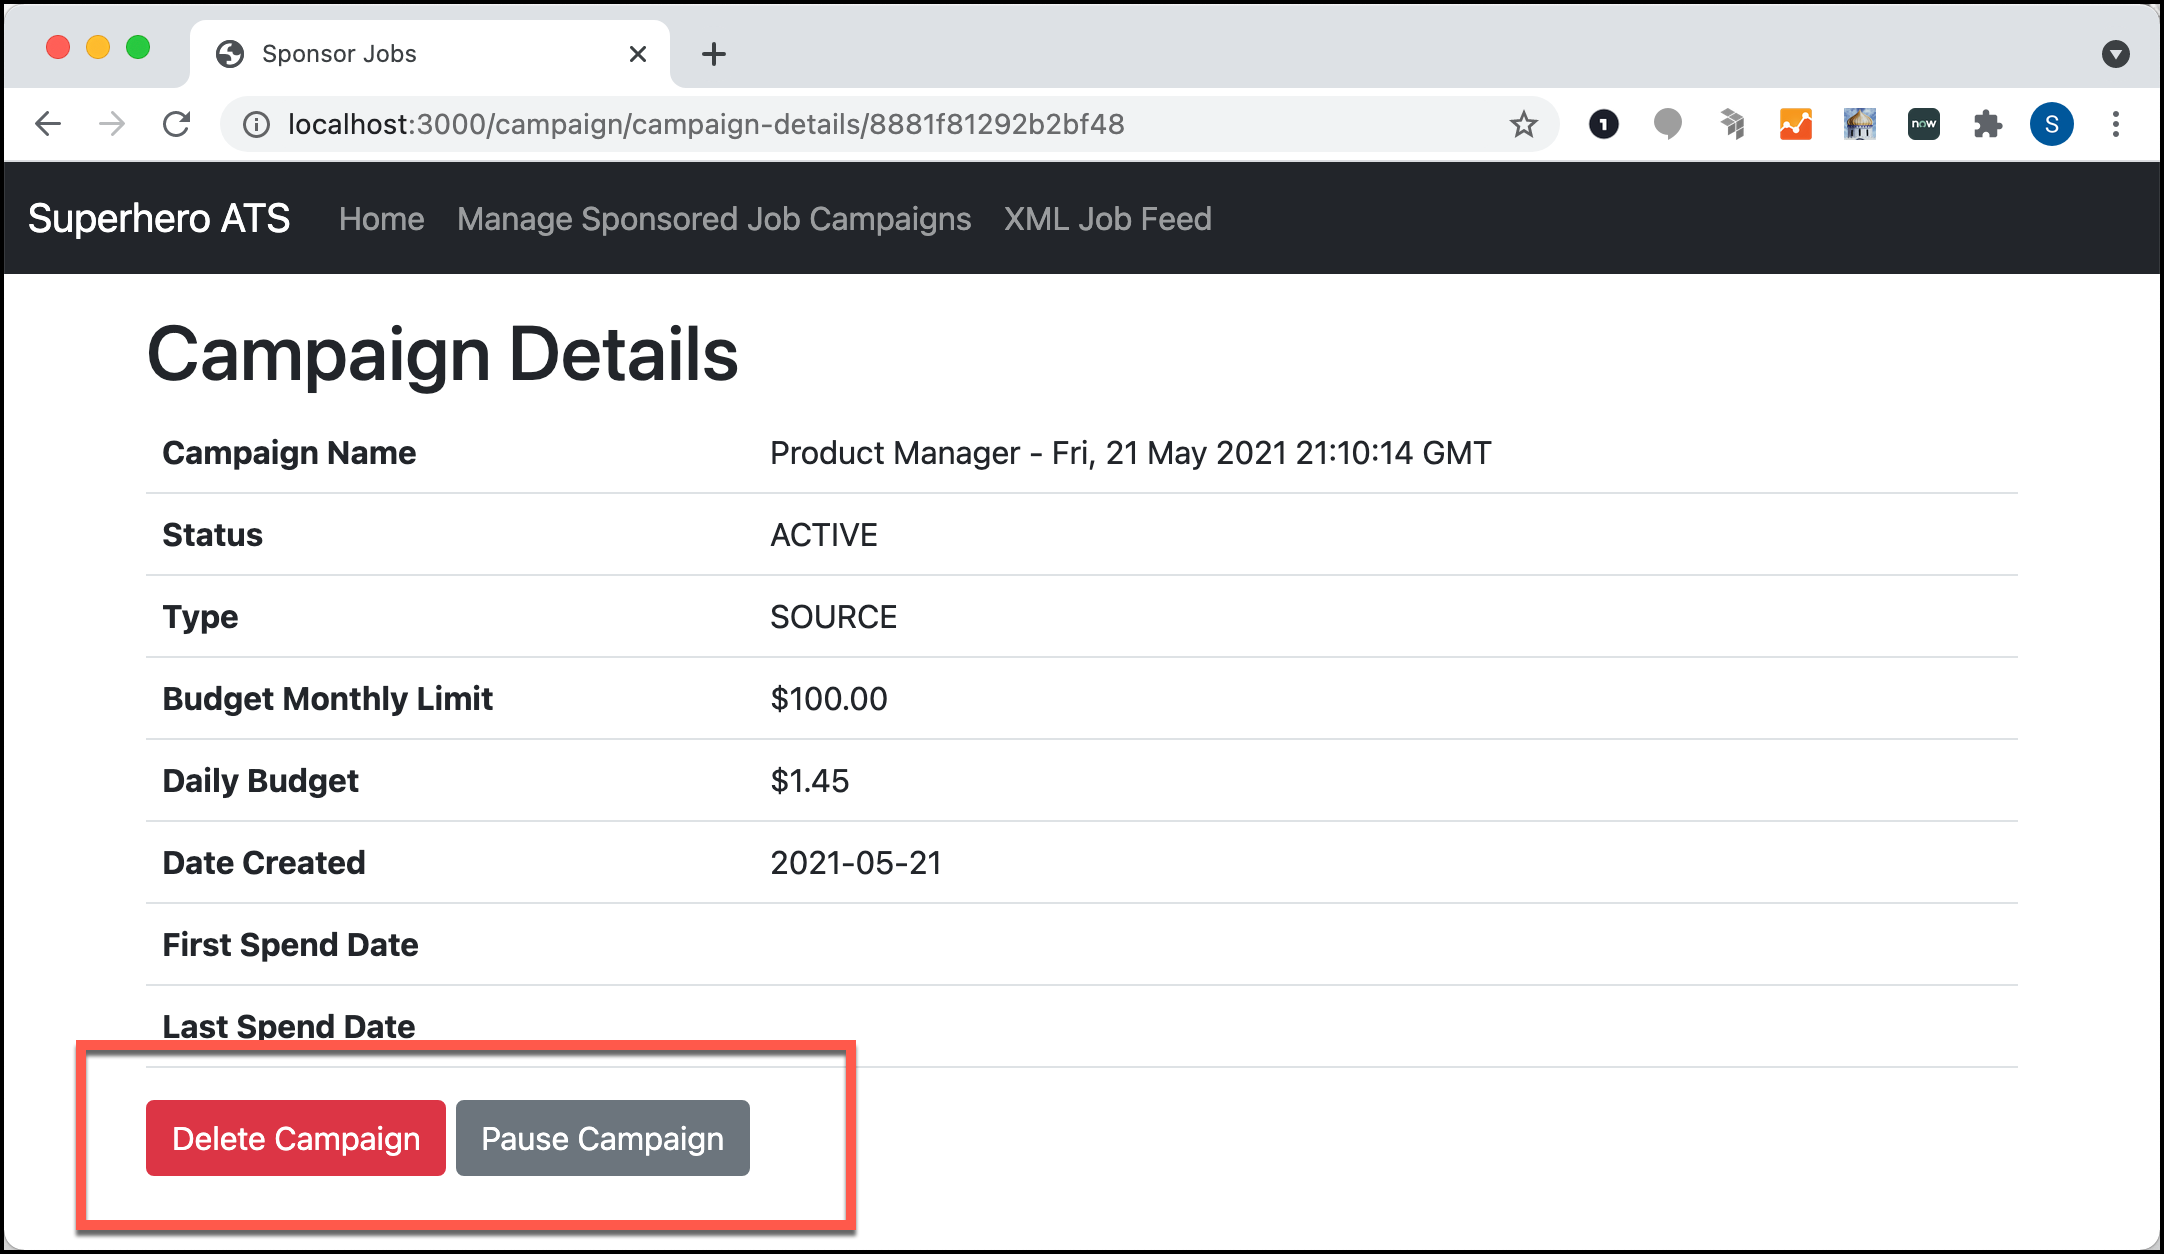
Get sponsored job campaign details
To view details for a sponsored job campaign, an employer can select View.

The sample code get the campaign details through the getCampaignDetails() method in the CampaignService class:
async getCampaignDetails(campaignId) {  // get campaign general info  const generalUrl = `${this.config.oysterBaseURL}/campaigns/${campaignId}`;  const general = await this.requestResource(generalUrl);
  // get campaign budget info  const budgetUrl = `${this.config.oysterBaseURL}/campaigns/${campaignId}/budget`;  const budget = await this.requestResource(budgetUrl);
  // get campaign properties info  const propertiesUrl = `${this.config.oysterBaseURL}/campaigns/${campaignId}/properties`;  const properties = await this.requestResource(propertiesUrl);
  return {    ...general,    ...budget,    ...properties,  };}
The getCampaignDetails() method calls these Indeed endpoints:
/campaigns/<id>- Returns general information on a campaign./campaigns/<id>/budget- Returns budget information for a campaign./campaigns/<id>/properties- Returns property information for a campaign.
The view combines and shows the data from these endpoints.
Pause, unpause, and delete campaigns
An employer can change the status of a campaign to pause, unpause, or delete the campaign. The updateCampaignStatus() method calls PATCH request against the /campaigns/<id> endpoint to modify a campaign's status:
async updateCampaignStatus(campaignId, newStatus) { const url = `${this.config.oysterBaseURL}/campaigns/${campaignId}`; const results = await this.requestResource(url, 'PATCH', { status: newStatus, }); return results.Campaigns;}When you delete a campaign, the campaign has the DELETED status, but is not deleted: